So often in dressage we hear, “inside leg to outside rein.” Just as common is a lack of understanding on how to achieve this connection, or what it is supposed to feel like. My first three articles covered balance, rhythm, and suppleness for both the horse and rider. A basic understanding of these principles, and the ability to apply them in your daily riding routine, is necessary to successfully developing an inside leg to outside rein connection. I encourage you to review the previous articles if the material isn’t second nature to you by now.
Inside Leg to Outside Rein Begins in the Seat
Begin by warming your horse up. Establish an industrious rhythm, and lead that rhythm with your seat. Check in with the suppleness and positioning of your torso as you find bungee-like contact. Execute many changes of direction until your horse moves off both your legs equally and without falling on the opposite shoulder/rein. Now you’re ready to begin establishing an inside leg and outside rein.
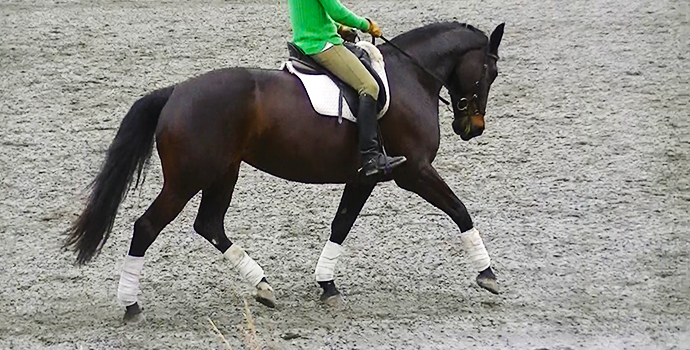
For me, the inside leg aid always starts with my seat, my weight, and lengthening of my leg. Let’s start on a circle, say tracking right. Friendly reminder, on a circle your torso will be swiveled to the inside (inside shoulder falls back, outside shoulder advances forward) while your hips will remain square ahead. The first step to your inside leg, outside rein connection is to drop your inside seat bone down and into your horse’s wither. You can still maintain your walk seat (or trot or canter), just now your inside seat bone will generally be more anchored toward your horse’s wither than your outside one. Next, lengthen your inside leg forward at the girth and feel your weight fall from your inside seat bone into your horse’s side and down the inside of your leg into the stirrup. Lengthen your inside leg by opening your knee angle a bit (but not enough to lock it straight) and stretching your heel down (but not enough to brace on your stirrup). It is perfectly ok for your toe to turn out a bit. This is how I begin every inside leg aid. Sometimes it is enough for my horse to bend. If it is not, with your inside leg long, it is now in perfect position for your leg to engage upward. As your horse moves his inside hind leg in response to your inside leg aid, pick up your outside rein. Now that your horse respects your leg, you can effectively add the rein aid for further refinement of his balance. If your horse reverts to not respecting your leg aid (falling out or falling in), it is necessary to go back to how you warmed up – contact providing framework for connection secondary to the leg. When you re-establish your horse’s obedient response to the leg, pick up again on the outside rein and maintain as steady of a connection there as you can without losing obedience to your leg.
Be sure when you’re picking up your outside rein that it is forward and against your horse’s neck. In that position, a steady outside rein can be established in a way that still allows your horse to bend. The purpose of the outside rein is to give something for your horse’s inside hind to connect to and to keep the outside shoulder fore. Fore means in front of the haunches, but specifically the inside hind. The horse responds to the inside seat and leg aid by engaging/stepping his inside hind forward and laterally under his body. Now the outside rein comes up and against the outside neck keeping the shoulder from also moving sideways. Asking the shoulder to stay fore in this way, allows it to move forward but not fall out. By alternating these aids and creating a greater attraction between them, your horse’s balance improves. Shoulders in front of engaged inside hind is best balance. Therefore, the efficacy of your aids improves as well, because better balance equals more ease of control.
The Game of Subtleties
Two truths are inherent in the use of alternating aids: 1) they are used one at a time rather than at the same time, and 2) in order to accomplish this, there must be a clear release after the application of each aid. It is true there’s only one moment in each stride when you can influence any one of the four horse legs. So there’s no point in an arm or a leg clinging to your horse for any length of time. As you apply the aid, and it reaches maximum intensity, the aid immediately begins to release with no lag or “hold” time. That took one stride. Take the next stride to feel what effect your aid had and determine your next course of action. Will you use the inside seat/leg or outside rein next stride? On the third stride apply and release your next aid, assessing in the following stride, repeat.
Self-carriage cannot happen if you’re using your aids to hold your horse in a frame or balance. So, yes, in the beginning you’ll be getting a lot of what feels like poor self-carriage. But what you’re doing is building the framework, or language if you will, upon which all the rest of your conversations with your horse will rely. Your horse is learning that when you apply pressure and he responds, you always release. He is learning also that you are someone who appreciates and responds to the subtle. Committing to a built-in release of every aid will ensure you don’t miss a response from your horse so subtle that you wouldn’t feel it if you were holding a strong aid. Horses in fact love subtleties! I think of it as a game–how subtle of an aid can I get a response from? How subtle of a response from my horse can I feel? Horses enjoy this game, catch on quickly, and you will be amazed as your horse becomes lighter and lighter to your aids and therefore better balanced, more adjustable, and easier to maneuver around the arena.
Feeling Shoulder-fore
Now that you have consistent enough responses to your inside leg and outside rein, your horse can start holding shoulder-fore for more than one stride. You’re still going to ask and release with your aid, but as he’s so much more responsive now, you can achieve the desired response in a single stride and repeat. Soon your horse will hold shoulder-fore from aiding every other stride instead of every, and so on. Maintaining your inside leg to outside rein connection off a circle means maintaining shoulder-fore all the time. When you lose control of the outside shoulder, unable to keep it fore, circle until you regain control. Even better, circle as soon as you feel the possibility of loss of control and fix it before it turns into a loss of connection between the inside leg and outside rein all together. Ultimately, we want adjustability – the ability to move the shoulder from straight to fore and eventually from fore to shoulder-in, back to fore, back to straight. So when you ask yourself, “Is this enough?” The answer is if your horse is adjustable, yes it is enough. If your horse is not adjustable, no it is not enough.
Understanding Flexion
Many people misunderstand the word flexion, and just like I used to, think about flexion only being in the poll and the jaw. Thinking of flexion in this way leads to using the inside rein to try to create an improved feeling in the contact or to put the horse more on the bit. Of course we know that being on the bit is a function of the horse’s self-carriage through his whole body and cannot be achieved through riding the head and neck alone. Still, sometimes it is tempting to pull on the inside rein because it’s easy and it yields immediate results. Flexion created by your inside rein will not last however. Flexion in the poll and jaw that lasts must be coupled with, and the result of, flexion of the horse’s whole topline. Flexion of the topline is also called longitudinal bend. Longitudinal bend is the horse’s desire to seek the bit or be round through his whole body. How the horse’s musculature work together to create this seeking response is discussed in the very first article in this series. Aiding for your inside leg to outside rein connection creates both lateral and longitudinal bend. Using your inside seat and leg to lift your horse into your outside rein encourages your horse to engage his hind legs under and lift his back and neck up and out into your receiving hand. If needed, review Artful Contact in Part II : Suppleness to ensure your hand is receiving. By angling your inside seat bone towards your outside hand and lifting with your inside leg forward and long, you can create flexion through your horse’s whole body which will improve more than just the feeling in your hand.
Connecting to Collecting
Your journey to compacting your horse has begun! It is the inside leg to outside rein connection that allows for a connecting and eventually collecting half halt. Work on perfecting this conversation with your horse every ride and you’ll feel a whole new world of performance opening up before you. Be aware that while thinking about controlling your horse’s shoulders, it is easy to become rein-focused. Remember that your horse going to your rein (seeking) from your seat and leg is the most important factor in the connection (and collection) equation. You cannot use your rein stronger than you can keep your horse pushed out to the rein from your seat / leg. You will often have to go back to re-building that seeking response from your seat / leg as overusing the rein is a very human mistake to make. The quicker you recognize the need to focus on the leg and seat in regaining engagement so your reins have something to channel, the more time you’ll spend on track in your training. It can be confusing because sometimes your horse is moving forward and sometimes your horse is making very strong contact and it will still be that you need a better seeking response from your seat / leg. It’s important to remember forward doesn’t automatically equal engagement of the whole topline. A horse can be forward and still need the rider’s seat and leg to improve muscular engagement and self-carriage. Also, any feeling in the contact that isn’t ideal is an indication that your horse isn’t honestly seeking the bit. Returning your focus to seat and leg to improve self-carriage and flexion of your horse’s whole topline will improve more than just the feeling in your hand.
Understanding Aiding: Part III–Connection